Made a new knife today. 1/2 inch coil spring steel. The new forge makes heating stuff a LOT easier. And it’s a controlable heat.

One side

The other side.
Does a nice job on the chopping board in the kitchen. Cut up chicken for supper with it and it just cuts. Tis rough except for the edges. Used a camshaft/crankshaft belt sander to polish the edge to a mirro finish. May wap the handle with leather. Not sure yet.
Another one. This one is a special order for a friend. Main part made from 1/4 inch electric fence post. Pin made from rest of 16 penny nail used for rivet on the ladle. Waste not want not… 😉


Needed a punch to make the holes in the ladle bowl and handle so this is what I made to get the job done. Made from a piece of 1/2 inch steel shafting. Fairly hard stuff.

Made a ladle for watering the coal from the slack tub. Ladle body was a piece of thick walled exhaust pipe. Handle was a piece of 1/4 inch electric fence post. Rivets were 16 penny nails cut off about a quarter inch from the head. Rivets were set hot.

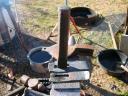
My slack tub ladle, in all it’s glory… 😉

Back of bowl showing rivets connecting handle.

And the scroll at the end of the handle. Comfortable to use and easy to control. Over all I am rather pleased with it.
Built a new forge yesterday (friday). Pix and a bit of bs follow.

This is the barrel I started with. Tis an old project of my dads from many years ago. Now a forge for me! Removed the brake rotors from each end and cut more out around the existing hole.

This is the burner assembly out of a 5 radiant gas heater. A few plumbing fittings and a air line quick connect fitting and it becomes the air blower system for the new forge. I ran this all day long today and the compressor came on 6 or 7 times total. I think this is a very effective air control system.

Air hookup. Will change the air quick connect to the other side of the forge and make the connecting line out of copper pipe to prevent hot metal hitting the plastic air line (again)…

Before legs and clay this is what it looked like.

First fire. Clay has just been packed in and fire lit.

A piece of spring heated to working temp. Note firebrick in background. Am now using several of them to contain and shape the fire. Working very well. Over all I am very pleased with this design. I am going to build another one out of strictly hardware store available plumbing parts to do a demo on how to build a compressed air aspirated coal fired 55 gallon drum forge.
Ran this one for 8 hours today and burned about 20 to 25 pounds of coal. Maybe. Need to get the scales out and weigh the coal and see what the consumption is. Compressor came on 6 or 7 times that I remember.


These were made out of a bar of steel 3/8 thick x 3/4 wide x 24 inches long. Each jaw is 1/2 half that bar. Hours and hours and hours and lots of beating with a hammer. But they work so nice. So I guess it was all worth it. 😉 Now to make another 6 to 8 pair. Gonna use 1/2 inch coil spring for the next few pair.
This is something I made. I think I have seen something like it before but this is my way. May add a base or make a piece to hang it on but for now here it is.

Side view

Top view

Finger holder and top twist close up.

Bottom twist close up.
Made a couple of Cloak pins the other day. Here are the pix.
Celtic Cloak Pin Small

Celtic Cloak Pin Large
And no I have no idea why I faced one one way and the other one the other way for the picture. But thats the way it is… 😉
As the title says. Do rag is to keep the locks from igniting from sparks or scale either at the forge or while welding.

Got some pix of some of the stuff I have been doing. The following are pix of my old leg vise and the new pieces I made for it. The strap and spring are 1/4 inch thick lawnmower blade. The slotting tool, wedge and keeper are pieces of 1/4 inch plate I have had laying around for years. Got a piece of red oak tree trunk about 4 feet long and 30 inches in diameter, dug a hole about a foot deep and put it on end in said hole. Tamped the dirt back around it and mounted the vise on it with 3 lag bolts. Will get pix of it mounted soon.

Leg Vise with new mounting hardware.

New leg vise pieces. Left to right – Slot opening tool I made. Front leg opening spring. Wedge. Slotted strap. Keeper. Mount, which I didn’t make but heated, beat out and repunched the end hole.

Prior to bending the strap the punch was used to punch holes on both ends of each slot to keep them from splitting when cut open with the chisel. Punched hot. Punch 3/4s of the way through turn over and punch back through and out. Took me 2 heats on each hole. Hope to get quicker…
Again prior to bending the strap the chisel was used to punch through the slots between the punched holes. Done hot. Punch almost through and then turn over and back through. Punched into an aluminum billet I made from some old pistons a couple of years ago.

After the slots were punched through I made this tool to open the slots and allow me to beat on the edges of the strap to open the slot. Just heated one end of the piece of metal and beat the sides in till it would fit across the corners of the hardie hole. Heated the other end and beat it to a wedge shape then ground it to about a 45 degree angle. And yes hitting it on the sides does bend it a bit but if the strap is red hot it does the job it was made to do. A couple of taps with the hammer on the other side and it’s back straight. Good enough to do the job is fine at times… 😉


