Camper Outside Almost Done
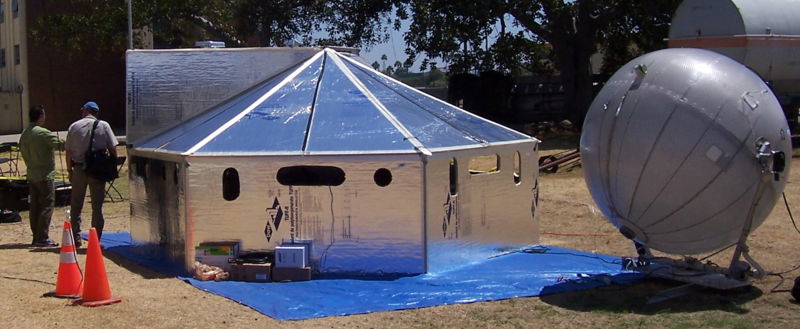
Outside of the camper is almost done. Still got a lot to do inside, as well as all the wiring both 12 and 120 volt, but getting a lot closer.
Outside of the camper is almost done. Still got a lot to do inside, as well as all the wiring both 12 and 120 volt, but getting a lot closer.
Last 13 posts were supposed to be one post. Tried to use iPhoto to auto post to wordpress but it didn’t work like I thought it would. Was gonna redo the posts but think I will leave them as is. Going to work up a album of all the pix of the camper rebuild and post it at some point so all the pix will be there anyway.
Looking like it will take a couple of tubes of caulk to finish the roof and exposed seams. Those will get covered with aluminum edging, salvaged from the popup and the camper the windows came from.
Closer than we were this morning. Hope to get the outside sealed up tomorrow. Then will move on to the inside and see if I can decide what to do in there…
More as I get it done.
Don’t know how I have missed this site this long, but now it’s on the feedreader so nevermore will I miss a post on sheds, and working in and on sheds. Got a lot of old posts to read through and they are some mighty fine posts too, I must say. Good stuff, I can see time problems till I get them all read… 😉
Didn’t get much done on the camper yesterday. Just too tired from the day before. Probably should have taken the day off today too but worked as much as I could between short showers.
Got the front left side conduit rib bent and installed and the left side finished up, wood wise. Also got the front two ribs bent and installed along with several of the front panels. Still got 5 (I think) outside pieces of plywood to cut and install on the front and then the curved part is ALL DONE! Still have some on the back/door wall to do as well as the door to build, which will get done but not till after the skin gets put on the top and sides.
Went to the storage area yesterday afternoon late and got enough of the plastic sheeting to cover the entire camper. Hope to get most of it put on tomorrow. Depends on the weather. Would rather have the rain than finish this up, as dry as it’s been this summer, but suspect from the weather report I just read that we won’t get much.
Will try to get some more pix tomorrow. Didn’t get any today. More as I get it done…
Been working on a camper the last few days. Decided to go ahead and build one out of the crap I have laying around here at the ranch.
Started off with stripping an old popup camper that has been weathering since the mid 80’s. Got it stripped down to the frame and remaining good plywood decking. Cut two new front corners in a right triangle 11 inches x11 inches, out of old pallet corners made of 3/4 inch plywood. Ground off the remaining screws where the plywood had rotted, so am starting with a pad about 6 feet by 7 feet. Am going to have to add a piece almost 3 x 6 feet at the back to cover the entire floor. That gives me a total area 76 inches by 120 inches to work with. Below are scans of the drawings I made of the basic floor and elevation plan for that floor area on separate pages:


Both floor and elevation plans on same page:

Will try to get pix of the floor and frame and assorted materials asap.
Brass Goggles » Blog Archive » The House on the Rock, Accidently Steampunk
Totally awesome! Well worth the time to just look through the pictures. Great stuff!
Living with Less: First, Hide the Bed (TreeHugger)
I like the bed under the floor, as well as the other storage and swing out areas. Interesting concepts.

Hexayurt Project – How To Live Wiki
Steve pointed out that I hadn’t posted about this yet so here it is. One of the links that I lost in the iBook freezing up and firefox not reloading all the many windows and tabs that I had open.
Lotta potential in this design. I am thinking about using a framing system of some kind (2×2 or 2×4 with some trimming done or maybe bamboo or saplings) and an alternative fabric and/or plastic roofing/siding. I realize this defeats the purpose behind this design but for the buildings I need I think it will work out cheaper though not necessarily cooler/warmer.
Ananova – Home sweet cement pipe
Interesting concept. Wonder how his floor is built.
Grand Designs – The Cambridgeshire Eco Home from Channel4.com/4Homes
A right interesting house. I really like the oak tree trunk stairway. Strawbale wall insulation is nice too. Well done and done well!
*update – The video is a really artsie fartsie bit of fluff. It does show a few things that are not in the picture gallery but really isn’t worth the time if you (like me, have a mac) have to download a 7.5 mb player and reboot the machine just to be able to view it.
Homesteading Today – Simple sawmill setup
The pix below are from the 4th post down and are owned by the poster. Reproduced here for my use only. This is the simplest setup I have seen for a stable, easy to operate, sawmill. I have bits and pieces of a sawmill and a chainsaw with Alaskan mill (actually seems to be based on the Alaskan mill design rather than actually using one) that I may use to build something similar. Cool!


Update Dec 31, 2008 – Here’s a link to fluidp’s post on his site about the sawmill. Thanks for commenting and helping folks with it. Have been somewhat (quite) lax about doing stuff on the site for a long time now. Will try to do better… 😉
Woman content living in 84-sq. ft. dream home | KATU – Portland, Oregon | Local & Regional
Java based video from the link under the picture. Neat little place. Would love to live in something like this but where would I put my library?
To get it to play in Linux I had to click on the pause button and move the position pointer all the way to the left then press the play button again.
I think I have posted about this house before but it was on a different site so here it is again. I wanna build one something along these lines!

I love this design. Not that I would ever buy one of these or even the plans (being the do it me self kind of guy that I is) but this is one of the coolest office trailers I have ever seen.

Home Grown Home: A Straw Bale Off Grid Double-Wide (TreeHugger)
That’s a hell of a way to beat zoning restrictions! Just build the straw bale house on a mobile home frame. Cool!
Van Os Keuls – Innovative building materials from everyday tin cans: eco-artware Recycling Rag Newsletter
A Can-Do House: A New Twist to Aluminum Siding
Got a few thousand soda and beer cans you’ve been waiting to recycle? Architect Richard Van Os Keuls, a resident of Silver Spring, Maryland, might be an inspiration.
Van Os Keuls lives in a 1953 brick tract house, to which he built a 230 sq. foot addition on to the back in 2000. The nearly-finished plywood and insulation board structure was covered with building paper, waiting to be sided or otherwise finished. He found bricks too expensive, and didn’t want the usual siding alternatives. After some thought and consideration, Van Os Keuls decided to try a new medium no architect and none of his clients had used before — flattened aluminum soda and beer cans.
Interesting concept. Just not sure of the practicality of it but that could just be me.
I’ve built several wall sections of aluminum cans and cement but am not gonna do any more that way. I’ll recycle the aluminum and use the cash to buy cement to use with glass and plastic bottles instead.
Sitting out another shower in the Registration Office.
Been working on another small building for Tim to use as a sales stand. This one is built out of scraps and more scraps.
Floor is plywood and osb scraps screwed to 4 foot long 2x6s set on 16 inch centers supported on two outer ends by 10 foot long osmose 6×6’s and in the center by a osmose 2×6 on edge. sections are joined by pieces of plywood screwed to to the sides where the 2×6’s join on the 2×6 upright.
Walls are 1×4 shipping frames put together in a lego fashion with a 4 inch overlap between them. Harder to discribe than to do. Again screwed together.
Front side posts are osmose 4×4’s 8 feet long. Or one of them is. The other is made of two pieces cut so they could be overlapped a foot and then screwed together.
Takes longer to build out of pieces and scraps but the only expense to date on this is fuel to get the materials, and cost of the screws.
Wall covering and possibally roof covering will be the plastic the other buildings are coated with. A bit of caulk and the roof seams should be quite tight.
Will be interesting to see how much can be done without additional funds being spent.
Still sprinkling a bit. So glad to see this rain. It’s started to settle the worst of the dust. Just need a few inches more of slow stuff over a month long period to bring some of the plants back.
Weaver Combat Ranch » Blog Archive » Wednesday 2007-05-09 Construction Details
More pix and details of the days work. Getting closer day by day…
Just a quick update, will take the camera out and get pix later today. Got the first 3 wall posts cut to length, headers cut and up, and first rafter cut and in place yesterday evening. Starting to look like more than just a pile of rubble and dirt. Has already been compared to a wooden stone henge (sp?). Ah well, slowly, slowly eats the elephant…

Todays pictures are up in the Roundhouse album at:
http://www.technoprimitive.org/roundHouseConstruction/index.html
Been down somewhat with a bug the last few days and doing little as possible. Got out some this afternoon and cut some more cedar 8 foot upright posts and 6 foot headers and one 15 foot rafter and carried them over to the round house. Got a couple of the 8 foot upright posts and one 15 foot rafter cut and carried over to the site yesterday.
After unloading them all, stood one of them up on the (facing the south facing entry way) right side of the door opening and screwed 3 saplings to it to hold it in place while I marked it for height prior to taking back down and cutting to length. Planing to put 3 uprights in place with two connecting headers and then put one primary and 4 secondary rafters in. Will add some bracing to the rafters as well as corner bracing on the uprights and headers. I figure that should secure it enough to add more uprights, headers, and rafters, without needing too much additional temp bracing.
And that was about it for the day. Going to Calcis tomorrow so will be back late.
That’s all folks…
Panorama Theme by ![]() Themocracy
Themocracy